The Five Breathing Self-Assessments Every Athlete Should Know
By Anthony Lorubbio, founder and head coach at Recal
If you’re an endurance athlete, a mountaineer, or even “just” your average athlete looking to optimize your performance and enjoyment in the mountains (yes, I fall in that category), you probably spend a lot of time training your body.
But what about your breathing?
Most athletes treat breathing like an autopilot function—it just happens, so why train it? But here’s the reality: just because it’s automatic, doesn’t mean it’s optimal. The way you breathe directly impacts your endurance, oxygen efficiency, and ability to perform under stress. And just like any other type of training, if you don’t measure it, you can’t improve it.
That’s what we’re here to talk about in this article: the five essential breathing self-assessments.
These self-assessments give you a clear snapshot, without the use of special equipment, of how well your respiratory system is working, what needs improvement, and where you can focus your breathwork training for better performance at altitude, in endurance sports, and in everyday life.
Let’s dive in.
1. The BOLT Score (Body Oxygen Level Test)
Assessment Credit: Oxygen Advantage
What it measures:
Your body’s automatic response to the feeling of breathlessness, and therefore how efficiently, especially biochemically (oxygen-carbon dioxide balance), you breathe.
How to do it:
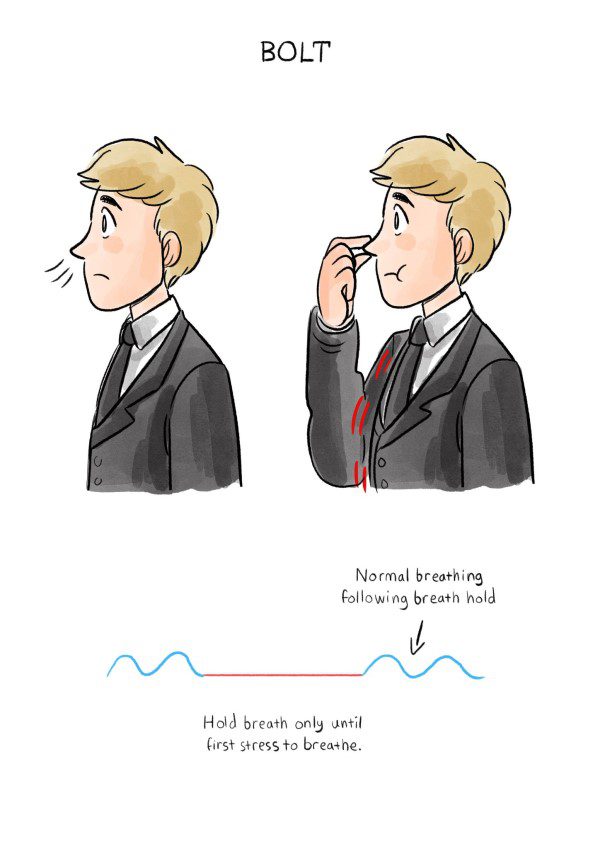
- Sit in a relaxed position and breathe normally.
- Take a normal inhale, then exhale as usual and pinch your nose to hold your breath (don’t gasp in extra air first).
- Time how long it takes until you feel the first strong urge to breathe—a swallow, diaphragm contraction, or that “air hunger” sensation.
- Stop the timer and breathe in normally (not a big gasp).
What your score means:
- 40+ seconds = You’re the apple of my eye as a breathwork coach
- 25-40 seconds = Solid
- 15-25 seconds = Room for improvement
- Under 15 seconds = Poor CO₂ tolerance. You’re likely overbreathing and breathwork training would do a lot of good.
Why it matters:
A low BOLT score means your body is more sensitive to CO₂, which leads to feeling out-of-breath, over-breathing, and poor oxygen utilization. Improving your BOLT score helps your endurance, recovery, and performance, especially in hypoxic environments (hello, high-altitude expeditions).
Note: factors like if you’ve eaten yet in the day, how much caffeine you’ve had, which hormone cycle you’re in (females), and your elevation may impact your assessment scores).

2. The CO₂ Tolerance Test
What it measures:
Your body’s sensitivity to carbon dioxide (CO₂) and breathing control under stress—keys for endurance and altitude performance.
How to do it:
- Sit comfortably with a timer.
- Take a few natural breaths to normalize your breathing.
- Take a very deep breath in, then start a very slow exhale through your nose (as slow of aN air “drip” out of your nose as possible).
- Use a timer to see how long your exhale lasts.
What your score means:
- 80+ seconds = Elite CO₂ tolerance. Your breathing efficiency is top-tier.
- 60-80 = Good CO₂ tolerance. Sufficient for many endurance and altitude challenges.
- 40-60 seconds = OK, but plenty of room for optimization.
- Under 40 seconds = You’re likely an “over-breather” and therefore have a low carbon dioxide tolerance
Why it matters:
CO₂ triggers the urge to breathe. If your tolerance is low, you’ll start gasping for air sooner than necessary, which wastes energy, sure, but it more importantly throws off the biochemical balance to your breathing and actually causes you to oxygenate your body LESS. This has to do with something called the Bohr Effect. Increasing your CO₂ tolerance means you can stay calm, breathe more efficiently to oxygenate your body more effectively, and reduce breathlessness under exertion.
3. The Maximum Breathlessness Test (MBT)
Assessment Credit: Oxygen Advantage
What it measures:
Yet again, your carbon dioxide tolerance, but also how well you can control your breathing under movement stress—essential for mountaineering and endurance training.
How to do it:
- Sit comfortably with a timer.
- After a natural and passive exhale, pinch your nose and start walking at a brisk hiking pace while holding your breath
- Count your steps until you absolutely have to inhale.
- Record your step count
How to do it:
- Stand up and take a few normal breaths.
- After a natural and passive exhale, pinch your nose and start walking at a brisk hiking pace while holding your breath.
- Count your steps until you absolutely have to inhale
- Record your step count.
How to do it:
- 80+ steps = Very strong; I’d follow you up a mountain
- 60+ steps = A solid score that you should be proud of.
- 40-60 steps = ”OK,” but plenty of room for improvement.
- 20-40 steps = Needs work.
- Under 20 steps = Call me, maybe
Why it matters:
This test mimics real-life endurance situations where you need to control your breath under high exertion, yet maintain mental composure (hence, why you’re also counting your steps).
4. The Location of Movement (LOM) Test

What it measures:
Where your breath movement happens—chest, ribs, or belly—and whether you’re using the right mechanics to breathe most efficiently.
How to do it:
- Sit or stand in an upright position with one hand on your chest and one on your belly.
- Look down the front of your body or into a mirror.
- Breathe normally for 30 seconds and observe where you feel and see the movement as you breathe.
How to do it:
- Zone 1 (Belly movement) = Optimal. Diaphragmatic breathing = highest oxygenation.
- Most of your oxygen diffusion into the blood stream occurs in the lowest part of your lungs. The key is getting air there.
- Zone 2 (Middle ribcage movement) = Acceptable, but could be better.
- Zone 3 (Upper chest/shoulder movement) = Inefficient. This area is called “dead space” because the oxygen isn’t getting into your blood stream. Plus, you’re using accessory breathing muscles instead of your primary ones (diaphragm in particular). This means you’re wasting energy and move breathing economically.
Read the full article on your Breathing Zones here
Why it matters:
Chest breathing is associated with stress, under-oxygenation, and over-breathing. Belly breathing (diaphragmatic breathing) ont he other hand allows for better oxygen exchange and energy efficiency. If you’re breathing in Zone 3 all the time, you’re likely overworking your respiratory muscles and fatiguing too quickly. Let’s get you into Zone 1.
5. The Range of Motion (ROM) Test
What it measures:
How much your rib cage can expand and contract—which indicates the overall flexibility of your thoracic cavity and rib cage. Therefore, this is an informal gauge (without special equipment) of your lung capacity and ability to breathe mechanically-efficient.
How to do it:
- Sit upright and wrap a tape measure (or string) around your lower ribs.
- a. The line that connects the two lowest points of your front ribs should create the lateral line that you wrap around your body.
- Take a full exhale and measure the circumference.
- Then take a full inhale and measure again.
- Write these scores down.
Now for the calculation:
-
- Record the difference between inhale and exhale measurements.
- Take that number and divide your EXHALE measurement from that.
- Then multiply by 1000. This “percentage” is now your ROM score
- Formula: (Inhale – Exhale) / Exhale *1000 = ROM Example: If you have a 34” inhale and a 31” exhale, that comes to 3” of difference. 3 / 31 (exhale number) = 0.09677419355 0.09677419355 * 1000 = 96.774 Example ROM = 96.78%
What your score means:
- > 120% = Elite
- 100 – 120% = Very good.
- 80 – 100% = Room for improvement.
- 60 – 80% = Poor thoracic flexibility. Your breathing mechanics are restricted breathing mechanics
- < 60% = Call me, definitely.
Why it matters:
This is not about how much air you can suck in with every breath; this is more a gauge of your general flexibility of your rib cage/thoracic cavity. If your ROM is limited, you’re restricted in your ability to engage and use your natural lung capacity, which is tied not only to endurance/oxygenation, but also your longevity.
Image courtesy of Advnture.com and Umer Latif.
Final Thoughts: Assess Your Breathing to Identify Where to Focus Your Training
Then train your breathing like you train your body.
Like I said at the beginning, you wouldn’t go on a strength training program without testing your baseline strength levels, right? The same goes for breathing. These five assessments give you a baseline for where your breathing is at today—and more importantly, they show you where you need to improve to optimize endurance, altitude performance, and energy efficiency.
Establish your baseline assessments today, start training, then use them to track your progress over time.
Let me know in the comments—which assessment was your lowest score? And if you want to learn how to improve your scores, drop me an email at info@recaltravel.com.
Note from Recal:
Umer’s climb is an example of how breathwork training can work. With just five weeks of practice, he summited over 6,000 meters with minimal acclimatization, kept his oxygen levels high, and didn’t experience altitude sickness.
To be clear: we absolutely do not guarantee a particular set of results. But if time is short, you can consider breathwork training as a supplement to your physical training. After all, why not train your breath like you train your body for a high altitude challenge?
Happy training!
Anthony and the Recal Team
Have you tried CO₂ tolerance training before? Drop us a note at info@recaltravel.com about your experience—or try these exercises and let me know how they work for you. Let’s make every breath an advantage for you on the mountain.
Disclaimer: results vary across clients and past performance does not guarantee future results. Response to altitude is very individual and depends on many factors. We always caution our clients to adhere to the advice of traditional acclimatization and local mountain guides.
Steps to Begin Your Training
1. Free Resources:
2. Five-Week Training Program Options:
- Personal Coaching: One-on-one guidance for $875.
- Online Video Training: Our most popular option for $275.
- Self-Guided Plan: Written instructions in PDF format for $75.
Why This Matters
Proper breathwork training doesn’t just help you survive at altitude—it can be the difference between accomplishing your goals — or not. By following a breathwork training program in advance of your trek, climb, race, or other endeavor in the mountains, you can: improve your CO2 tolerance to feel less breathless, strengthen your respiratory muscles, refine your breathing mechanics, keep your oxygen saturations levels high, feel more in control, improve overall movement economy, improve endurance, and ultimately ENJOY your time in the mountains more.
Ready to take the first step? Explore Recal’s training program options or sign up for the next workshop to experience the transformative power of breathwork training first-hand.
Get In Touch
Have questions or need more information? We’re here to help.
- Comment directly on the Youtube Videos: We’ll respond as quickly as possible.
- Email Us: Reach out to info@recaltravel.com for detailed inquiries.
Conclusion: There's Now a Better Way to Train for Altitude
Recal’s High Altitude Breathwork Training program equips you with the tools and techniques needed to handle high altitudes confidently. Don’t let altitude concerns hold you back—embrace this comprehensive training program and embark on your adventure with confidence.
Once again, I’m Anthony. From all of us here at Recal, we wish you the best of luck in your upcoming adventures. See you on the mountain soon!
Happy Training,
Anthony and the Recal Team
~ Message from Recal ~
Thanks for stopping by our blog. Here at Recal, we offer breathwork-based coaching to help you prepare for life’s greatest endeavors.
The latest program we offer is High Altitude Breathwork Training to get you ready for the mountain, even if you live at sea level. We also created Guidebook to use as a daily journaling tool; it has helped leaders around the world live more focused and fulfilling lives.
If you’re curious about our Guides, click the links below to submit your information and receive a free digital copy:
We also have a strategic partnership with Oxygen Advantage and use their products (like mouth tape for sleep and SportsMask for altitude training) to help our community become better leaders through breathwork training and proper breathing habits. You can view their online breath courses and products by clicking here.
We stand by the things that we offer and promote – and proudly use them ourselves.
If you have any questions, we’re here to help: email us at hi@recaltravel.com.
Disclaimer: results vary across clients and past performance does not guarantee future results. Response to altitude is very individual and depends on many factors. We always caution our clients to adhere to the advice of traditional acclimatization and local mountain guides.